Flash 5 - Part 7: Keyboard, Mouse &emp; Text Output
Introduction
So far we have learned how to gather mouse input events (using the On Mouse Event action) using a Button Instance and attaching event handlers to it. This is fine for simple tasks like launching a new web browser URL, controlling an animation or for bringing up an animated menu, but suppose we want to create input forms, test for keys and display output on the screen, how do we do this?
Trace, the final debug frontier
trace ("some variable " + _root.MyVariable);
Text Input &emp; Output
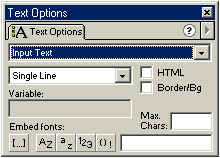
First use the 'A' tool to place some text on the screen then open up the Text-Options panel and change the type to 'Input Text'. You can enable the [x] Border/Bg option if you wish.
Give the Text instance a name (eg. 'txtInput'). This will enable us to access it just like a regular variable (NOTE for Javascript programmers: You do not need to apply a '.value' postfix to access the actual text string).
Use the 'A' Text-tool again to place a 2nd Text instance somewhere on the work-area. This time choose 'Dynamic Text' from the Text-Options and give it the name 'txtOutput'.
Create a Button if you haven't got one in your Library (or drag one from the examples if you wish). Drag an Instance of the button onto the work-area, open up the Actions-panel and attach the following action-scripting to that Button Instance.
on (release){
	txtOutput = txtInput;
	txtInput = "";
}
Funky Functions
Right-click on the very 1st frame of the root Movie on the time-line (ie. frame 1 of Scene) and add the following Actions.
Note: Remember to choose Expert-Mode (keyboard CTRL-E) and you can copy
and paste the code. :-)
// define some stuff on frame 1 //
_root.Counter = 0;

object.prototype.funky = function(strInput) {
	var temp = _root.Counter.toString();
	temp+= ":" + strInput.toString().toUpperCase();
	_root.Counter++;
	return temp;
}
Change the action-scripting on the Button's Instance to the following:
// actions on the Button instance
on (release) {
	txtOutput = funky(txtInput);
	txtInput = "";
}
What the above code does
Firstly, we init all our stuff (define global variables, functions etc..) on the very first frame on the main Time-Line. (You can define them anywhere you want, you can even #include some external script source if you wish). We define a variable called 'Counter' and init it to 0. We use the '_root.' prefix to access our global variable, otherwise Flash defaults to the current context (ie. the current Time-line, Instance etc..)
Secondly, we define a Method prototype from the root Object, object. This basically means we can just use 'my_function_name(..)' anywhere.
Thirdly, we write our function code and pass back the result using the C-like
'return' statement.
var temp = _root.Counter.toString();
This defines a local (var) and assigns it the string value from our global _root.Counter variable. The .toString() method is used to force the variable's value into a string.
temp+= ":" + strInput.toString().toUpperCase();
This concatenates the input string (which I've forced into a String and then to UpperCase) with the temp variable.
	_root.Counter++;
	return temp;
Lastly, we increment our global counter and return the resulting string to the caller.
Keyboard Input
on (keyPress "<Enter><enter>") {
	txtOutput = "YEP, hit enter";
}
You don't need to create lots of buttons to handle more than one key press. You can assign many of these event handlers to the same Button Instance.
Mouse click repeats
This is where those Movie-Clip containers come to the rescue once again. We
can create an empty Movie-Clip with 2 KeyFrames and place some action-scripting
on the 1st frame. This Movie-Clip will act like an animation and will continously
loop (repeating our actions).
// some actions for our blank 'repeater' 2-frame Movie-Clip
// place them on frame 1 on that Movie-Clip's time-line
_root.txtOutput = _root.Counter++;
Once our 'repeater' Movie-Clip is in the Library, all we need to do is to drag an Instance of it inside our Button's 'Over' frame. So whenever the mouse is moved over the button, that invisible 'repeater' animation will kick off and run.... of course the same actions will happen for every Instance of the same button, if you don't want this to happen then use the Duplicate Symbol option in the Library window to create another copy of the Button Symbol.
Timers, Animations and Repeats
Another point worth noting is that your Button image frames don't have to be static, you can use a Movie-Clip animation in each of the 3 KeyFrames (Up, Over and Down) to create some funky animated effects.
2-frame Loops
Closing words
You should be familiar with the basic input and output functions of Flash. When creating interactive stuff you will be using the above techniques alot.
Happy looping